Get started
February 12, 2018 • read

Technology Tips: February 2018 Edition
|
Skyward IT Services Network Infrastructure and Security Specialists |

Skyward IT Services

PowerPoint 2016 Screen Recording
Did you know you can use PowerPoint 2016 to capture a screen recording and directly embed it into your presentation? Imagine, for example, how much more successful a training could be when your team can see exactly where and how to complete a task, and can even return to the PowerPoint later and watch the video for reference.To enable recording in PowerPoint, click on File, then Options. In the popup box, click Customize Ribbon on the left. Then, in the box on the right that lists the available tabs, select Recording and click OK. You should now see the Recording tab at the top of your screen. To create the recording:
- Select the slide you want to put the recording on.
- On the Recording tab you’ve enabled at the top of your screen, click on Screen Recording.
- In the popup menu, you’ll notice the program is automatically set up to record audio and include your mouse. Deselect these options if you don’t want to record them. (Note that you’ll need a built-in or external microphone to record audio.)
- Click Select Area, then use the cross-haired cursor to highlight the area you want to record. To record the entire screen, click the Windows logo key + shift + F.
- When you’re ready to start, click the circular Record button. Then complete whatever tasks you’d like to record.
- To end your recording, click the Windows logo key + shift + Q. The video will automatically be embedded into the slide you selected in step 1. If you prefer to save it as a separate file, right click its image on the slide, then select Save Media As. Name the file, choose where you want it saved, and click Save.
Pro tip: With your recording selected, click on the Playback tab at the top of your screen. Here you can trim your video and select various playback options. On the adjacent Format tab, change the look of your video by adding a border or shadow, for instance, or adjusting characteristics like color and brightness.
Listen to Your Mac
It can be easy to miss mistakes when you’re reading your own work. So, next time, before you send out that board report or important letter to your students’ parents, give it a listen as well. To set up your Mac so it can read to you:- Click the Apple icon on the menu bar in the upper left corner, then select System Preferences.
- Click on Accessibility, then choose Speech from the options on the left.
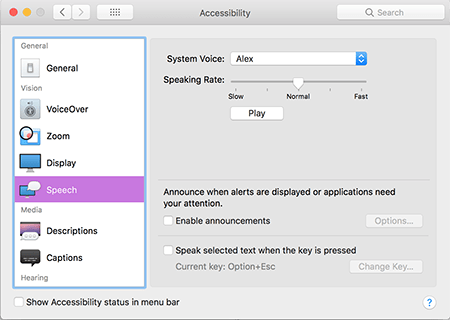
- Select which system voice you want to hear (Samantha, Victoria, Alex, or Fred) and adjust the speaking rate. Click the Play button to listen to a sample.
- Check the box at the bottom next to “Speak selected text when the key is pressed.” By default, pressing Option + Esc will tell your Mac to speak, but you can change this key code here.
- Listen to your work! To instruct your Mac start speaking, press the key code you’ve set up. If you’ve selected text on the page, your Mac will read that text to you. If you haven’t made a specific selection, your Mac will start reading any available text. If no text is available to be read, you’ll hear a beep.
- To end your Mac’s speaking, press the key code again.
Snapchat's Ghost Mode
Some tech-savvy educators are using apps like Snapchat to engage their students. But while these apps are fun, they also pose significant security risks if the proper precautions aren’t taken. Consider Snapchat’s relatively new Snap Map feature. Snap Map lets Snapchatters share their locations and view the locations of their friends using the app. If your students don’t have the best judgement on who they add on Snapchat, this means random strangers can know where they are—now that’s a privacy issue! Enter Ghost Mode. Ghost Mode hides your Snap Map location visibility.To turn on Ghost Mode:
- Open Snap Map by pinching on the camera screen in the app.
- Tap the Settings icon in the upper right.
- Toggle on Ghost Mode.
If you’d prefer to completely prevent Snapchat from accessing your location, you can turn all location data sharing off. With an iPhone, go to Settings, Snapchat, Location. Then switch While Using the App to Never. If you’re an Android user, go to Settings, Apps, Snapchat, Permissions. Then toggle off Location. Note that turning off all location data for the app will disable geofilters, Snap Map, and your ability to discover stories around you. If these features are important to you, opt to limit sharing via Ghost Mode.
Malware of the Month
Be survey savvy! Some scammers are using surveys to attack unsuspecting victims. Picture this: You receive an email from an unfamiliar source requesting your participation in a survey. When you click on the link that will take you to the survey, malware is installed on your computer, opening the door for attackers to watch everything you do, collecting your passwords and banking information. Attackers then use this information to make purchases on your credit card and eventually steal your identity.To keep yourself safe, never fill out a survey you’re not expecting. If you’re not sure if a survey is legitimate, steer clear. The reward you may be offered for filling it out is simply not worth the risk.
“You are cruising along, and then technology changes. You have to adapt.”
–Marc Andreessen, co-founder of Mosaic and Netscape web browsers
Follow-Up Resource: IT Services
Need help securing and optimizing your network? Check out the many IT Services we have available and contact us today.Thinking about edtech for your district? We'd love to help. Visit skyward.com/get-started to learn more.
|
Skyward IT Services Network Infrastructure and Security Specialists |